We created an immediate implantation surgical guide. This protocol brings together the practical experience of the Refformat surgical team. The guide was developed by the scientific group of the clinic under the leadership of Khyshov Maxim Vladimirovich.
We prepared a manual protocol for young doctors who start their surgical dentistry practice. The guide will tell you in detail about the operation of one-stage implantation. We described the entire process of surgical treatment: from the consultation and algorithm of surgical manipulations to postoperative management of the patient.
Protocol of immediate implantation
Modern methods of dental treatment:
Minimum time spent by the patient in the chair
Modern standard of implantological treatment
1/13.
The painlessness of the surgical stage
Creating optimal conditions for prosthetics
Predictability of the result
Minimal injury the operation
Long-term clinical result and excellent aesthetics
Terms and criteria for immediate implantation
2/13.
Immediately after tooth extraction
Immediate implantation
There is no healing of bone and soft tissues
The prevalence of the type in our practice
There is no healing of bone and soft tissues
Clinical situation during implant placement
About 6-8 weeks
Early implantation after soft tissue healing
Clinical situation during implant placement
Gum healing without bone healing
The prevalence of the type in our practice
We rarely use it. With immature tissues, it is difficult to analyze an X-ray and control the development of the inflammatory process.
About 12-13 weeks
Early implantation with incomplete healing of bone tissue
Clinical situation during implant placement
Gum healing and substantial bone healing
The prevalence of the type in our practice
A popular technique. The bone is more mineralized
compared to the early implantation period. A simplified drilling protocol allows the implant to be installed. We do not use a finishing drill and a tap.
compared to the early implantation period. A simplified drilling protocol allows the implant to be installed. We do not use a finishing drill and a tap.
6 months or later
Delayed implantation
Clinical situation during implant placement
Complete healing of tissues in the area of the socket
The prevalence of the type in our practice
We use it rarely, usually with large destructive processes of the jaws, for example, cysts from 2 cm in diameter
Indications and contraindications
3/13.
Coincide with the indications for tooth extraction
Root caries
Root fracture
Chronic periodontitis of hard severity without exacerbation
Chronic granulomatous periodontitis (any periodontitis)
after elimination of acute inflammatory phenomena
Absolute contraindications
Heart attack or stroke
Diseases of the cardiovascular system
Obtaining the conclusion of a cardiologist 6 months after the onset of the disease
Conditions for implantation
We are waiting for 6 months from the onset of the disease
Our recommendations
Diseases of the endocrine system
Our recommendations
Consultation and treatment at the endocrinologist. After stabilization of the condition, control tests and a specialist opinion are necessary
Conditions for implantation
Glucose less than 7 mmol/ml,
glycated hemoglobin less than 7.5 mmol/ml.
Normalization of calcitonin levels
glycated hemoglobin less than 7.5 mmol/ml.
Normalization of calcitonin levels
Radiation/ chemotherapy in the anamnesis
Oncological diseases
Our recommendations
If the maxillofacial area is irradiated, implantation is not possible.
In other cases, we wait for 6 months
In other cases, we wait for 6 months
Conditions for implantation
Obtaining an oncologist’s opinion after 6 months from the onset of the disease
Taking bisphosphonates
Osteoporosis
Our recommendations
Consultation of the attending physician regarding long-term replacement therapy, more than 6 months
Conditions for implantation
— Stop taking bisphosphonates 6 months before implantation
— Conclusion of the attending physician
— Stabilization of biochemical parameters
— Conclusion of the attending physician
— Stabilization of biochemical parameters
— Diabetes: glucose over 10, glycated hemoglobin over 8
— Diseases of the thyroid gland
— Diseases of the thyroid gland
Relative contraindications
Pregnancy
Lactation
Age under 18
Herpetic rashes
We are planning implantation after pregnancy. In case of acute inflammatory pathology, we remove the tooth at any stage of pregnancy.
The antibiotic amoxicillin is compatible with breastfeeding. During lactation, bone resorption prevails over osteogenesis. In our practice, no significant differences were found during implantation.
In the acute stage, we do not perform implantation.
The candidate's age is determined by skeletal maturation, not passport age. The closure of the main growth zones is determined by the X-ray of the hands. We perform implantation after the closure of growth zones.
Acute infectious processes in the oral cavity
Specific diseases
During the period of deterioration of the general condition of the body
Infectious diseases
2-3 days before the operation, we perform oral sanitation and prescribe rational anti-inflammatory and antibiotic therapy.
Implantation is carried out with in consultation with the attending physician.
Implantation is carried out in consultation with the attending physician.
Implantation is performed after stabilization of the condition. With arterial hypertension, it is carried out in consultation with the attending physician, under sedation and under the supervision of an anesthesiologist-resuscitator.
Example: cold, flu, high blood pressure
Rational antibiotic therapy is important.
Example: with viral liver damage, fluoroquinolones are allowed: Levofloxacin, Clinafloxacin, Ofloxacin, – and penicillin group antibiotics: Ampicillin, Ampisid, Ampic, Azlocillin.
Example: with viral liver damage, fluoroquinolones are allowed: Levofloxacin, Clinafloxacin, Ofloxacin, – and penicillin group antibiotics: Ampicillin, Ampisid, Ampic, Azlocillin.
Example: syphilis, actinomycosis.
The first days of the women's cycle
Cosmetic injections
The pain threshold and blood coagulation are reduced. We recommend postponing surgical procedures for a few days.
We recommend postponing the operation for 7−10 days, the formation of hematomas is possible.
Initial consultation
4/13.
Find out the patient’s complaints and expectations. It is important to discuss the duration and stages of treatment, and to inform about possible complications.
We collect information about the patient's bad habits and chronic diseases.
An orthopedic surgeon makes a comprehensive treatment plan. The implantologist pl an implantation.
Collection of anamnesis and conversation with the patient
16:45
Сбор анамнеза, обсуждение ожиданий пациента, знакомство
11:06
Данные внешнего осмотра челюстно-лицевой области
02:34
Диагностика патологий ВНЧС, особенности открывания рта
Biotype and condition of soft tissues
The presence of bridles
Dental formula
Examination of the oral cavity
04:53
Осмотр слизистой оболочки полости рта и красной каймы губ
The required amount of oral cavity sanitation before implantation
02:29
Прикус, его патологии, зубная формула
03:05
План лечения, этапность хирургии, ортопедии, терапии
01:06
Заключение
Bone height in the implantation area
Proximity of the maxillary sinus
Proximity of the mandibular nerve
X-ray analysis
The presence of inflammation, cysts, fractures of the tooth
Presence of multiple chambers, sinus septa
Bone height in the implantation area
Proximity of the maxillary sinus
Proximity of the mandibular nerve
Analysis of a 3D Cone Beam Tomography Image
The presence of inflammation, cysts, fractures of the tooth
The presence of several chambers, septa in the sinus
Thickness of the cortical layer
Density of spongy bone (A tool in Viewer)
Resorption of the cortical plate
Thickness of the vestibular bone
Sublingual recess
Discussion of the need for treatment under sedation
Indications for treatment under sedation are
Large volume of surgical intervention
Aggravated allergic anamnesis
Pathologies of the cardiovascular system
Stomatophobia
Necessary analyses
Electrocardiogram (ECG)
Detailed biochemical blood analysis
General blood test
The analysis for hospitalization is an analysis for HIV, syphilis and hepatitis B and C.
Occlusal and side mirror
Soft tissue retractors
ISO 100
Photo protocol
Aperture F22-29
Shutter speed 1/160
You will need:
Camera Settings for Canon:
20:24
Why conduct a photo protocol
Preoperative preparation and planning
5/13.
00:55
How to process a patient
01:13
Aseptics and antiseptics
Hand Preparation
Hand Preparation
01:27
How to set up the operating table
Operating table instruments
Lowering handpiece 1\20
Step-up handpiece
Scissors
Suture material
Needle holder
Korntsang for processing the face and oral cavity of the patient
Carpules with anesthetic
Farabeuf Hook/Minnesota Retractor
Sterile saliva ejectors with adapter
Curved tweezers
Anatomical tweezers
Universal curette
Curette spoon
Sickle trowel
Periodontal probe
Dental rasp (xyster)
Scalpel and disposable blades 15C, 12D
Metal bowl for collecting autobones
Mirror
Carpool syringe
Forceps
Elevator
Optragate
Sterile gauze wipes
Antiseptic preparation for the treatment of the patient’s hands and face
We also use:
Aqueous solution of chlorhexidine bigluconate 0.2%
Bone-plastic material Bio-Oss or other osteoconductive dispersed material
Implantology Kit
Equipment for the operation
Liston centrifuge, model C 2204. We use it in the 3000 rpm mode, 20 minutes to make a PRF membrane.
Physiodispenser
This centrifuge is a matter of pride of Russian production.
Tooth Extraction Tools
straight forceps
bayonet tongs
S-shaped forceps
Forceps for removing wisdom teeth in the upper jaw
beak forceps
Elevators with a flattened working part 3–4 mm, with a narrow working part for anterior teeth - 1.5–2 mm
It is possible to use luxators, but they are thinner than elevators, so they will not be able to give a full force.
Elevators and Luxators
Immediate Implant Protocol
6/13.
We divide the anesthetic cartridge into 5–7 injections in order to avoid hydraulic fracturing of the underlying tissues.
1–1.5 carpules are injected from the vestibular side according to the type of infiltration anesthesia, 1/3 carpules are injected from the palatal side.
Anesthesia
PRF / Platelet Rich Fibrin is a platelet-rich fibrin clot.
After anesthesia, we take 8 ml of venous blood for the manufacture of PRF, use a 9 ml Vacuette tube with filler. With the action of adrenaline, the membrane is of better quality than when taking blood before anesthesia.
Making a PRF Membrane
according to the personal practice of anesthetists at the Refformat clinic.
The blood is centrifuged at 3000 rpm for 10 minutes.
Atraumatic
Fast
Comfortable for the patient
Criteria for a successful tooth extraction
We use carbide burs for sawing the crown part, this will help avoid unpleasant odors.
Carbide bur for crown fragmentation
Lindemann cutter with extended part
5:1 step-up handpiece
Fragmentation of teeth
Turbine handpiece is not intended for surgery
Required tools:
After separation of the crown part of the tooth, we remove the vestibular wall of the root with a cutter.
We form a cut in such a way as to form a space where a fragment of the tooth root will be moved when the elevator moves.
Fragmentation of single root teeth
We focus on the initial state of the tooth. With the preserved crown part of the tooth, we cut in the projection of the furcation and remove the roots with an elevator.
We form a cavity with a cutter in the cervical zone of the tooth, on the border with the bone, under the working part of the elevator. We make a cut in the projection of the extraction of the root.
Fragmentation of multi-rooted teeth
We determine the trajectory of extracting a fragment of a tooth, depending on the point of application.
We form a site with a triangular bur according to the standard protocol.
When working with pilot drills, the rotation speed is 500–700 rpm.
The use of irrigation avoids overheating of the bone. Osteoblasts are destroyed at 47°C.
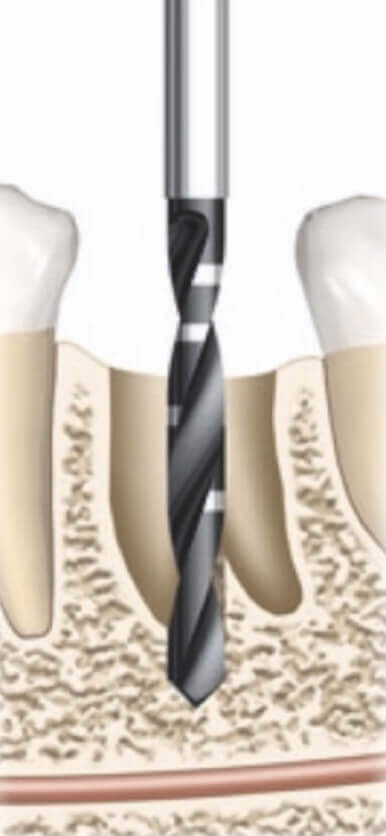
Formation of the implant site
We exclude additional trauma to the bone due to continuous reciprocating movements.
The positioning of the drill is carried out in the palatal or lingual wall of the socket or in the bi/trifurcation region, since these zones are more stable. The cortical vestibular plate is thinner and less supplied with blood.
We set the bur in the correct orthopedic position, and do not focus on the contour of the socket.
The depth of drilling is determined relative to the lower bone edge.
Positioning
When forming the bed, we determine the trajectory of the position of the implants using the parallelism pins.
For dense bones, use special drills.
The implant is placed in the center of the ridge, closer to the back wall of the socket. Orientation along the line of fissures.
We evaluate the correct position of the implant after healing of the socket and bone remodeling.
The thickness of the bone around the implant is more than 1 mm.
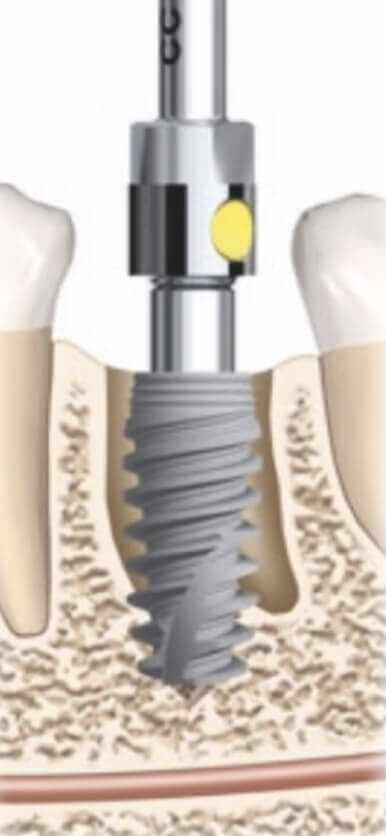
Implant placement
Bone remodeling after immediate implantation is about 1.5 mm in height.
The implant is installed palatally relative to the projection of the root.
01:10
Formation of the implant site
Formation
Forming cutter for the entire intended length of the implant with a mode of 500–700 rpm.
Basic drilling: 250 rpm, no irrigation for bone collection.
Bed preparation algorithm
At each stage of drilling, we check the position of the implant with a parallelism pin.
Прецизионное сверло Precision Drill (дополнительно)
Пилотное сверло
Drill with tip Tapered, Ø 2,0 мм
Drill with tip Tapered, Ø 2,0 мм
Индикатор направления
Direction indicator
Direction indicator
Корневидное сверло
Tapered Drill, Ø 3,5 мм
Tapered Drill, Ø 3,5 мм
Корневидное сверло Tapered Drill, Ø 4,3 мм
We collect autobone from the turns of the drill when forming the site.
In a metal bowl we mix it with bone-plastic material.
Autologous bone harvesting during bed formation
We wet the bone material with the liquid component of the fibrin clot or saline.
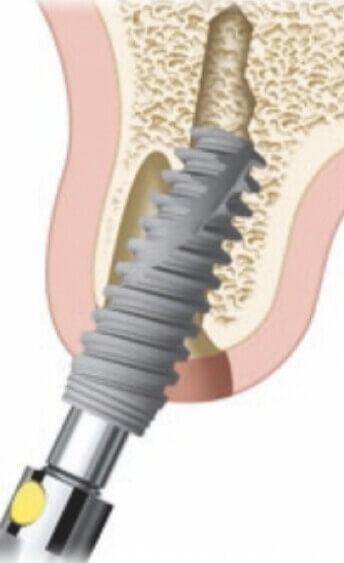
We open the implant from the sterile package above the operating table.
We check the fixation of the implant driver on the implant before inserting it into the oral cavity.
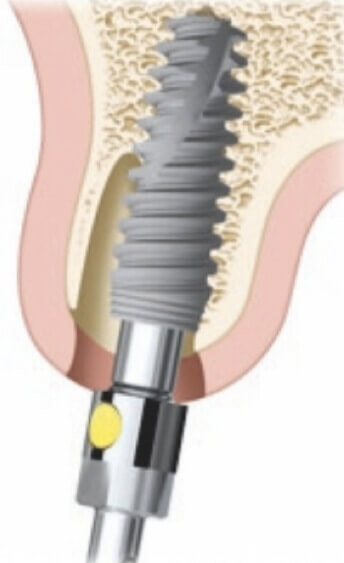
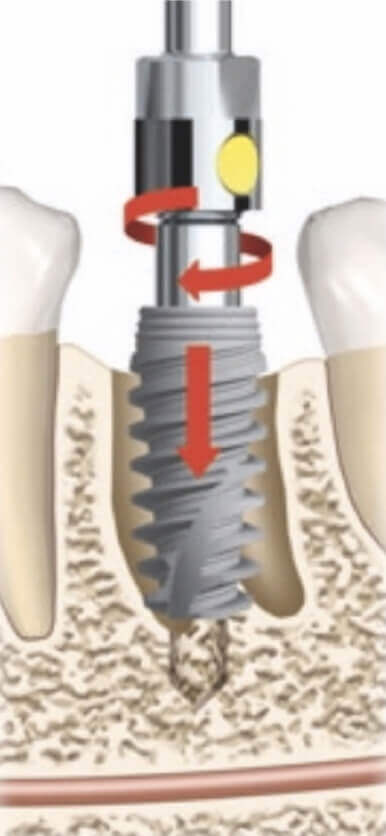
Surgical stage. Implant placement
We use a key ratchet or ratchet for the final positioning of the implant.
We estimate the required level of implant penetration into the bone.
An implant with a conical connection is deepened by 1.5–2.5 mm.
An implant with a flat connection and a polished neck is placed 0.5 mm below the bone level.
Determining the depth of implant insertion into the bone
Deepening of the implant is necessary for the formation of the biological width.
- Gingival sulcus.
- Epithelial attachment. We form the largest part to the polished neck or abutment, which must be well polished. Epithelial attachment is formed to the polished neck of the implant or to the abutment. The quality of polishing of the abutment and crown neck is important.
- Connective tissue attachment to a rough surface.
- Biological width.
The concept of biological width
Choosing the optimal position of the implant in the bone
We take into account the anatomical features of the receiving implant site, as far as it is surrounded by a bone.
Lower jaw
Excessive bone compression at a torque of more than 70 N/cm2 is not achieved in the trifurcation zone, since an insignificant part of the implant surface is surrounded by bone.
Upper jaw


<15 H/cm2
Low
20
Stability value
Cover screw
Possible suprastructure
25-30 H/cm2
Short gum former, minimum chewing load
Stability value
Possible suprastructure
Medium
35
<35 H/cm2
It is possible to make a crown (aesthetically significant area). The temporary crown is NOT involved in the bite
Stability value
Possible suprastructure
High
70
<70 H/cm2
Avoid such values, perform bone decompression
H/cm2
Stability value
Possible suprastructure
Soft tissue plasty after implant placement
7/13.
Work in an aesthetically significant area
Thin or medium gum biotype
Criteria for the use of CTG in implantation
High smile line
The presence of pronounced frenulum of the lips, gum recession
Insufficient volume of attached gingiva
Severe defect of the vestibular bone of the socket of the tooth
Donor zone: maxillary tubercle or palate area.
We determine the size of the graft at the sampling stage. We use a periodontal probe.
Features of CTG sampling
After sampling, we move the graft into saline.
Drying of the graft is unacceptable.
We use a sharp scalpel 15C or an ophthalmic one. We form an incision in the submucosal layer, slightly larger than the size of the graft.
We position the graft in the formed pocket.
We fix the graft with one suture.
Preparing the Receiving Site for CTG
We use suture material with a thread thickness of 6–0.
In the space of the socket in front of the implant, we loosely introduce a mixture of autoclave with bone-plastic material
We preliminarily impregnate the bone mixture with the liquid PRF fraction.
After making the bone material, we remove the excess.
Bone grafting
The bone-plastic material is covered from above with a wrung-out PRF membrane to avoid contact with the oral cavity.
Using PRF
Soft tissue plasty
Analysis of the control X-ray
8/13.
In simple cases, we use an orthopantomogram, but take into account the distortion up to 25%.
In most cases, we perform CBCT.
Orthopantomogram
In the photo, we determine the unfixed gum former.
After the operation, we evaluate the position of the implant
Integrity of anatomical structures.
The degree of immersion of the implant into the bone.
The presence of bone tissue on all sides of the implant.
CBCT
What data needs to be checked?
Postoperative management
9/13.
Tight fit to soft tissue, no ischemia
Removal from the bite by 1.5-2mm
Safety precautions for the patient: do not bite, the crown performs an exclusively aesthetic function.
Temporary prosthetics in an aesthetically significant area
Temporary crown parameters:
Recommendations for the patient
On the day of the operation
Amoxiclav 875 mg. 1 tablet 2 times a day for 5 days. Combine with meals.
Omez 1 tablet in the morning 30 minutes before meals, for 5 days.
Ibuprofen 400 mg 1 tab for pain relief.
For the first two days, apply cold once every two hours for 15 minutes in the area of the operation.
From the following day
Dexamethasone 2 tablets 1 time per day. Start taking the drug the next day after surgery and take it for 3 days.
Carry out oral baths 3-4 times a day after meals for 5 seconds.
Conduct oral baths with an aqueous solution of chlorhexidine 0.02% (Perio Aid or Paradontax) from the next day after implantation for 10 days.
Within 10 days, brush the teeth in the area of operation only with a surgical soft toothbrush, starting from the following day.
Refuse active physical activity for 3 days. Do not take a warm bath and do not go to the bath for 2 weeks.
Quit smoking for 2 weeks.
- The next day, the curator of the clinic calls the patient and finds out about his well-being.
- Inspection and removal of sutures are carried out after 10-14 days.
- Inspection with a control radiography is carried out after 5-6 weeks.
- Photo protocol and prosthetics.
- Control examination and x-ray are carried out 1 time in 6 months during the first year after the end of the treatment. Further control inspection and picturing are carried out every year.
Stages of clinical management of the patient
Complications
10/13.
We install the implant as distally as possible according to the protocol and fix the plug.
We choose the size of the collagen membrane. The membrane will be fixed with pins one tooth further from the defect.
If there are neighboring teeth, we make an intrasulcular incision. It ends behind the adjacent tooth and rises without damaging the papilla. You should be comfortable working, and you should not peel off a large flap.
Fracture of the cortical plate
What to do? Option 1
The socket around the implant is filled with autologous bone. We can take the bone tissue from the tubercle of the upper jaw and pack it in the area of the defect with bone-plastic material. From above we cover it with a membrane and fix with pins.
We suture all the incisions, the membrane itself remains visible in the lumen of the socket.
We install the implant as distally as possible according to the protocol and fix the plug.
The fragment is rotated and fixed with mini-screws.
We fill the socket around the implant with autologous bone with osteoplastic material, and cover it with a PRF membrane from above.
What to do? Option 2
All incisions are sutured without tension, the membrane remains visible in the lumen of the socket.
We plug the base of the socket with a collagen sponge or PRF membrane without strong pressure.
Using a nasal test, we check the tightness of the mucous membrane of the maxillary sinus.
We inform the patient that it is necessary to slightly blow into the nose.
Perforation of the mucous membrane of the maxillary sinus
What to do:
We conserve the socket.
Careful analysis of the 3D image.
Conducting a nasal test — pinch the patient’s nose and ask to blow.
In a doubtful situation, we initially plan to conduct a closed or open sinus lift. Criteria for selecting the necessary operation and the protocol for carrying out can be read in a separate protocol of Refformat.
How to avoid:
When working on the upper jaw in the sinus area, we are deliberately set to perform a sinus lift.
We form a new orthopedically correct site closer to the palatine or lingual wall.
If it hasn’t worked out, we preserve the tooth socket.
Low primary stability
What to do:
We evaluate our capabilities and the initial situation.
We plan to form a site inside the wall of the socket, not next to it.
The implant should be surrounded by bone tissue by at least 1/3 of the diameter and by 2-3 mm in the apical part.
How to avoid:
Socket conservation
11/13.
Two (three) wall defects in the vestibulo-oral direction.
Deep and wide socket, when the diameter of the cyst is greater than the diameter of the proposed implant.
Indications for socket conservation
The rarefaction of bone tissue at the apex of the molar, even with a preserved septum, cannot always be sutured tightly.
If the defect is single-walled, then it is possible to install an implant, and fill the free space with a mixture of autologous bone and xenograft, cover it with a pressed PRF membrane and suture it up.
The patient’s fear, willingness to wait, or financial situation.
Without walls. We place the osteoplastic material mixed with the PRF membrane.
Three-wall defect without cortical plate. Mucosal support is needed to avoid soft tissue collapse. The socket is loosely filled with osteoplastic material mixed with autologous bone.
Operation protocol
Defect with preserved walls. To stabilize the clot, we use only the PRF-membrane, we do not lay either autologous bone or osteoplastic material.
The manipulation protocol depends on the type of defect.
Overview of studies
12/13.
Publications
There are no significant studies on this topic, so we are conducting our own large study on the effectiveness of this protocol.
Russian publications
medical-diss
pubmed
International publications
There is no specific digital data for the dissertation. Even in international studies there is data only on a small sample of installed implants. 116 pieces in total.
pubmed
International publications
In 2008, there were no objective data on implant research. A lot has changed since then. We recommend that you familiarize yourself with the works of Professor M. Esposito
Therefore, we created the Reformat science project, within which we are planning to provide objective data on long-term monitoring of the implants that we have installed.
We are interested in cooperation with young doctors who are full of enthusiasm and desire to contribute to the development of evidence-based surgical dentistry!
We are interested in cooperation with young doctors who are full of enthusiasm and desire to contribute to the development of evidence-based surgical dentistry!
Reformat science
Immediate implantation video protocol
13/13.
02:24
Front department
01:38
Distal department

Helping people improve their quality of life
Contacts
2022 © Refformat. All rights reserved
Special thanx to Vlad Koselovskiy for the translation

Questionnaire
To see the content you must fill out the form
Study guides
Сlinic


Study guides
Сlinic
To contact the curator of the ref practice
Watch video broadcasts of live operations

